GitHub SMS notifications using Twilio
Before you start
All of the tutorials assume you have already completed the Get started guide, which gets you set up with a Cloudflare Workers account, and the Workers CLI tool, Wrangler.
Overview
In this tutorial, you will learn to build an SMS notification system on Workers to receive updates on a GitHub repository. Your Worker will send you a text update using Twilio when there is new activity on your repository.
You will learn how to:
- Build webhooks using Workers.
- Integrate Workers with GitHub and Twilio.
- Use Worker secrets with Wrangler.
Create a project
Start by using wrangler init to create a Worker project in the command line:
Create a project$ wrangler init github-twilio-notifications
$ cd github-twilio-notifications
Inside of your new github-sms-notifications directory, index.js represents the entry point to your Cloudflare Workers application. You will configure this file for most of the tutorial.
You will also need a GitHub account and a repository for this tutorial. If you do not have either setup, create a new GitHub account and create a new repository to continue with this tutorial.
First, create a webhook for your repository to post updates to your Worker. Inside of your Worker, you will then parse the updates. Finally, you will send a POST request to Twilio to send a text message to you.
You can reference the finished code at this GitHub repository.
Configure GitHub
To start, configure a GitHub webhook to post to your Worker when there is an update to the repository:
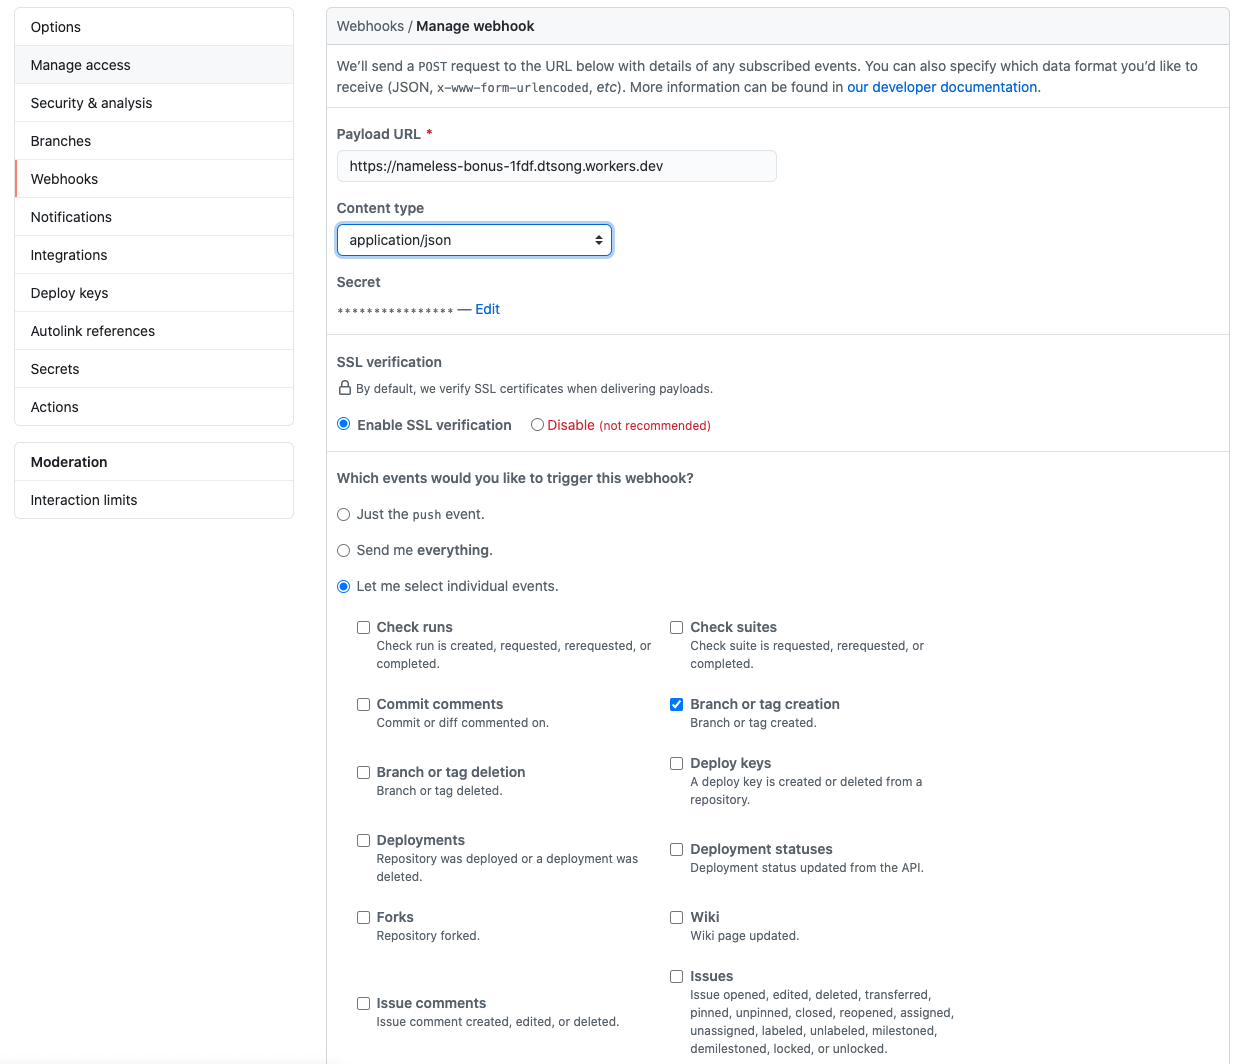
Go to your GitHub repository’s Settings > Webhooks > Add webhook.
Set the Payload URL to the
/webhookpath on your Worker URL. You can find your worker URL by populating your account id in thewrangler.tomlfile and then runningwrangler publishin your command line to generate a live URL for your Worker.In the Content type dropdown, select application/json.
In the Secret field, input a secret key of your choice.
In Which events would you like to trigger this webhook?, select Let me select individual events. Select the events you want to get notifications for (such as Pull requests, Pushes, and Branch or tag creation).
Select Add webhook to finish configuration.
Parsing the response
With your local environment set up, parse the repository update with your Worker. If you experience any difficulty, refer to the finished index.js.
Your generated index.js should look like this:
index.jsaddEventListener('fetch', event => {  event.respondWith(handleRequest(event.request));
});

/** * Respond with hello worker text * @param {Request} request */
async function handleRequest(request) {  return new Response('Hello worker!', {    headers: { 'content-type': 'text/plain' },  });
}
Begin by modifying the starter code to handle a POST response and renaming the request handler. Use the request.method property of Request to check if the request is a POST request, and send an error response if the request is not a POST request. The simpleResponse function is an easy wrapper for you to respond with requests using your Worker.
index.jsfunction simpleResponse(statusCode, message) {  let resp = {    message: message,    status: statusCode,  };
  return new Response(JSON.stringify(resp), {    headers: { 'Content-Type': 'application/json' },    status: statusCode,  });
}

addEventListener('fetch', event => {  event.respondWith(githubWebhookHandler(event.request));
});

async function githubWebhookHandler(request) {  if (request.method !== 'POST') {    return simpleResponse(200, 'Please send a POST request :)');  }
}
Next, validate that the request is sent with the right secret key. GitHub attaches a hash signature for each payload using the secret key. Use a helper function called checkSignature on the request to ensure the hash is correct. Then, you can access data from the webhook by parsing the request as JSON.
index.js - githubWebhookHandler()async function githubWebhookHandler(request) {  if (request.method !== 'POST') {    return simpleResponse(200, 'Please send a POST request :)');  }  try {    const formData = await request.json();    const headers = await request.headers;    const action = headers.get('X-GitHub-Event');    const repo_name = formData.repository.full_name;    const sender_name = formData.sender.login;
    if (!checkSignature(formData, headers)) {      return simpleResponse(403, 'Wrong password, try again :P');    }  } catch (e) {    return simpleResponse(200, `Error:  ${e}`);  }
}
The checkSignature function will use the crypto library to hash the received payload with your known secret key to ensure it matches the request hash. GitHub uses an HMAC hexdigest to compute the hash in the sha1 format.
index.jsconst crypto = require('crypto');

async function createHexSignature(requestBody) {  let hmac = crypto.createHmac('sha1', SECRET_TOKEN);  hmac.update(requestBody, 'utf-8');
  return hmac.digest('hex');
}

async function checkSignature(formData, headers) {  let expectedSignature = await createHexSignature(formData);  let actualSignature = headers.get('X-Hub-Signature');
  const expectedBuffer = Buffer.from(expectedSignature, 'hex');  const actualBuffer = Buffer.from(actualSignature, 'hex');  return expectedBuffer.byteLength == actualBuffer.byteLength &&             crypto.timingSafeEqual(expectedBuffer, actualBuffer);
}
Your wrangler.toml file should look like this:
"wrangler.toml"name = "nameless-bonus-1fdf"
workers_dev = true
route = ""
zone_id = ""
Sending a text with Twilio
You will send a text message to you about your repository activity using Twilio. You need a Twilio account and a phone number that can receive text messages. Refer to the Twilio guide to get set up. (If you are new to Twilio, they have an interactive game where you can learn how to use their platform and get some free credits for beginners to the service.)
You can then create a helper function to send text messages by sending a POST request to the Twilio API endpoint. Refer to the Twilio reference to learn more about this endpoint.
Construct your headers and body in the format shown in the Twilio reference page. Change the from value to your Twilio phone number.
index.js - sendText()async function sendText(message) {  const endpoint = 'https://api.twilio.com/2010-04-01/Accounts/' + ACCOUNT_SID + '/Messages.json';
  let encoded = new URLSearchParams();  encoded.append('To', RECIPIENT);  encoded.append('From', '+19388887573');  encoded.append('Body', message);
  let token = btoa(ACCOUNT_SID + ':' + AUTH_TOKEN);
  const request = {    body: encoded,    method: 'POST',    headers: {      'Authorization': `Basic ${token}`,      'Content-Type': 'application/x-www-form-urlencoded',    },  };
  let result = await fetch(endpoint, request);  result = await result.json();
  return new Response(JSON.stringify(result), request);
}
To make this work, you need to set some secrets to hide your ACCOUNT_SID and AUTH_TOKEN from the source code. You can set secrets with wrangler secret put in your command line.
$ wrangler secret put ACCOUNT_SID
Use Wrangler to set your Twilio ACCOUNT_SID, RECIPIENT(your number), Twilio AUTH_TOKEN, and SECRET_TOKEN (for GitHub) secrets to the respective values.
Modify your githubWebhookHandler to send a text message using the sendText function you just made.
async function githubWebhookHandler(request) {  if (request.method !== "POST") {    return simpleResponse(200, "Please send a POST request :)");  }  try {    const formData = await request.json();    const headers = await request.headers;    const action = headers.get("X-GitHub-Event");    const repo_name = formData.repository.full_name;    const sender_name = formData.sender.login;
    if (!checkSignature(formData, headers)) {      return simpleResponse(403, "Wrong password, try again :P");    }
    return await sendText(      `${sender_name} casted spell: ${action} onto your repo ${repo_name}`    );  } catch (e) {    return simpleResponse(200, `Error:  ${e}`);  }
}
Run the wrangler publish command to deploy your Workers script:
$ wrangler publish
Now when you make an update (that you configured in the GitHub Webhook settings) to your repository, you will get a text soon after. If you have never used git before, refer to this quick guide to pushing to your repository.
You can reference the finished code on GitHub.
By completing this tutorial, you have learned how to build webhooks using Workers, integrate Workers with GitHub and Twilio, and use Worker secrets with Wrangler.