Configure your CDN
Before you start
All of the tutorials assume you have already completed the Get started guide, which gets you set up with a Cloudflare Workers account, and the Workers CLI tool, Wrangler.
Overview
In this tutorial, you will build and publish a Cloudflare Workers function that serves assets from a storage platform (in this example, Google Cloud Storage) to your users. This approach, called white-labelling, often takes the form of complex DNS configuration. With Cloudflare Workers, and Cloudflare’s CDN, you can build a solution to this complexity in a few lines of code.
This tutorial will teach you how to build and publish a Cloudflare Workers function to configure your CDN. No prior experience with serverless functions or Cloudflare Workers is assumed.
If you want to review the code used in this tutorial, the final version of the codebase is available on GitHub. You can take that code, customize it, and deploy it for use in your own projects.
Prerequisites
This tutorial assumes that you have a public bucket on Google Cloud Storage. You will use it to serve assets through your Cloudflare Workers function. If you do not have a Google Cloud Storage bucket to use with this project, review Google Cloud’s Cloud Storage Quickstart guide.
This tutorial makes use of sample images to illustrate serving data through your Cloudflare Workers function. If you have an existing set of images you would like to use, you can upload those to your Google Cloud Storage bucket and use them — if you do not have an existing set of images, this tutorial provides a sample set of profile pictures via UIFaces.com, formatted in numeric order (1.jpg, 2.jpg, … 199.jpg).
To follow along with this tutorial using the data set provided, download the sample image collection and upload the zipped folder faces to the root of your bucket. The directory structure should look like this:
your-bucket└── faces ├── 1.jpg ├── 2.jpg ├── ... └── 99.jpgFinally, to ensure that you can access the objects from your Workers function, your Google Cloud Storage bucket should be publicly accessible. To ensure this, follow the Making groups of objects publicly readable guide in the Google Cloud Storage documentation.
Init
Cloudflare’s command-line tool for managing Worker projects, Wrangler, supports various templates — pre-built collections of code that make it easy to get started writing Workers. You will make use of the default JavaScript template to start building your project.
In the command line, create your Worker project, cloning the worker-template URL and passing in a project name (for example, serve-cdn-assets):
Create a new project$ git clone https://github.com/cloudflare/worker-template serve-cdn-assets
$ cd serve-cdn-assets
By default, Wrangler will use our worker-template. Wrangler templates are git repositories, so if you want to create your own templates, or use one from our Template Gallery, there is a variety of options to help you get started.
Cloudflare’s worker-template includes support for building and deploying JavaScript-based projects. Inside of your new serve-cdn-assets directory, index.js represents the entry point to your Cloudflare Workers application.
All Cloudflare Workers applications start by listening for fetch events, which are triggered when a client makes a request to a Workers route. After a request is received by the Worker, the response your application constructs will be returned to the user. This tutorial will guide you through understanding how the request/response pattern works and how you can use it to build fully featured applications.
index.jsaddEventListener('fetch', event => {  event.respondWith(handleRequest(event));
});

/** * Fetch and log a request * @param {Request} request */
async function handleRequest(event) {  return new Response('Hello worker!', { status: 200 });
}
In your default index.js file, you can observe that request/response pattern in action. The handleRequest constructs a new Response with the body text "Hello worker!", as well as an explicit 200 status code.
When a Worker receives a fetch event, the script must use event.respondWith to return the newly constructed response to the client. Your Cloudflare Worker script will serve new responses directly from Cloudflare’s global network instead of continuing to your origin server. A standard server would accept requests and return responses. Cloudflare Workers allows you to respond quickly by constructing responses directly on the Cloudflare global network.
Build
Any project you publish to Cloudflare Workers can make use of modern JavaScript tooling like ES modules, npm packages, and async/await functions to build your application. You can build full applications, or serverless functions on Workers using the same tooling and process as what you will be building with this tutorial.
The Cloudflare Workers project built in this tutorial will be a serverless function that runs on a wildcard route and receives requests. When the serverless function receives an incoming request, it should parse the URL, find what asset is being requested and serve it from the configured Cloud Storage bucket.
Because the asset will go through your Workers function, and Cloudflare’s network, you can also make use of both Cloudflare’s default caching behavior, as well as your own custom logic, to ensure that as much data can be cached at Cloudflare’s globally distributed data centers. The result is an easy-to-understand and highly performant CDN configuration, with the ability to customize it to your application’s specific needs.
Handling requests
Currently, the Workers function receives requests and returns a simple response with the text "Hello worker!". Begin configuring the function by adding an additional check — requests coming in to the function should only be GET requests. If it receives other requests, like POSTs or DELETEs, it should return an error response, with a status code of 405. Using event.request.method, the resulting code is:
index.jsasync function handleRequest(event) {  if (event.request.method === 'GET') {    return new Response('Hello worker!', { status: 200 });  } else {    return new Response('Method not allowed', { status: 405 });  }
}
Given that the incoming request to the function is a GET, the majority of your implementation will happen inside of that conditional, replacing the "Hello worker!" response. Create a separate function, serveAsset, which will house the majority of the implementation for the remainder of the tutorial:
index.jsasync function serveAsset(event) {  return new Response('Hello worker!', { status: 200 });
}

async function handleRequest(event) {  if (event.request.method === 'GET') {    return serveAsset(event);  } // ...
}
Routing to your assets
Reviewing the original definition of this project, at the beginning of Build, the serveAsset function should parse the URL, find what asset is being requested, and serve it from the configured Cloud Storage bucket. To do this, the event.request.url field should be parsed using the URL library, and set to url.
Given an instance of the URL class, url, there are a number of useful properties that can be used to query the incoming request. serveAsset should check the pathname, which contains the part of the URL after the host: for example, given the URL https://assets.mysite.com/faces/1.jpg, the pathname will be /faces/1.jpg:
index.jsfunction serveAsset(event) {  const url = new URL(event.request.url);  console.log(url.pathname); // "/faces/1.jpg"
}
With that path available, the function can simply request the corresponding path from your Cloud Storage bucket. Given a constant BUCKET_NAME (you will set it to my-bucket in this tutorial), set a BUCKET_URL constant, append url.pathname to the end of it, and fetch it to get your function’s response:
index.jsconst BUCKET_NAME = 'my-bucket';
const BUCKET_URL = `http://storage.googleapis.com/${BUCKET_NAME}`;

function serveAsset(event) {  const url = new URL(event.request.url);  return fetch(`${BUCKET_URL}${url.pathname}`);
}
Custom caching
At this point in the tutorial, deploying this script would give you a fully-functional project you could use to retrieve assets from your Cloud Storage bucket. You will now continue to explore how to configure your CDN with Workers by making use of the Cache API.
To cache responses in a Workers function, the Cache API provides cache.match, to check for the presence of a cached asset, and cache.put, to cache a response for a given request. Given those two functions, the general flow will look like this:
- Check for the presence of a cached asset and set it to
response. - If
responsedoes not exist, get the asset from cloud storage, set it toresponseand cache it. - Return
responsefrom the function back to thefetchevent handler.
The Cache-Control header is a common way that HTML responses indicate how they should be cached. The Workers implementation respects the Cache-Control header, in indicating how assets should be cached on Cloudflare’s CDN. In building a custom asset serving solution, and enabling caching, you should set a custom Cache-Control header (in this example, you will set it to public, with a max-age value of 14400 seconds, or four hours).
When the asset is retrieved from cloud storage, the serveAsset function should construct a new instance of Response, copying much of the HTML response data from the cloud storage response, but overwriting the response headers. By doing this, you will define your own custom caching information and pass it to the Workers Cache API.
When you add something to the cache, it is important to note that an HTML response is designed to only be processed once in your code, according to the Service Worker spec that Cloudflare Workers implements. To address this, clone the asset response using response.clone(), pass that cloned response to the Cache API, and return the original response back from the function. The final code looks like this:
index.jsasync function serveAsset(event) {  const url = new URL(event.request.url);  const cache = caches.default;  let response = await cache.match(event.request);
  if (!response) {    response = await fetch(`${BUCKET_URL}${url.pathname}`);    const headers = { 'cache-control': 'public, max-age=14400' };    response = new Response(response.body, { ...response, headers });    event.waitUntil(cache.put(event.request, response.clone()));  }  return response;
}
If an asset is requested that does not exist, or if your bucket policy does not include public access to an asset, serveAsset will pass back the corresponding error page directly to the client. Instead of doing this, the returned response should be checked in handleRequest: if the status code is higher than 399 (where 200-level status codes indicate success, and 399-level status codes indicate redirection), return a truncated response with just the status and statusText from response:
index.jsasync function handleRequest(event) {  if (event.request.method === 'GET') {    let response = await serveAsset(event);    if (response.status > 399) {      response = new Response(response.statusText, { status: response.status });    }    return response;  } else {    return new Response('Method not allowed', { status: 405 });  }
}
And with that, you are finished writing the code for this tutorial. The final version of your script should like this:
addEventListener('fetch', event => {  event.respondWith(handleRequest(event));
});

const BUCKET_NAME = 'hugo-workers';
const BUCKET_URL = `http://storage.googleapis.com/${BUCKET_NAME}`;

async function serveAsset(event) {  const url = new URL(event.request.url);  const cache = caches.default;  let response = await cache.match(event.request);
  if (!response) {    response = await fetch(`${BUCKET_URL}${url.pathname}`);    const headers = { 'cache-control': 'public, max-age=14400' };    response = new Response(response.body, { ...response, headers });    event.waitUntil(cache.put(event.request, response.clone()));  }  return response;
}

async function handleRequest(event) {  if (event.request.method === 'GET') {    let response = await serveAsset(event);    if (response.status > 399) {      response = new Response(response.statusText, { status: response.status });    }    return response;  } else {    return new Response('Method not allowed', { status: 405 });  }
}
Publish
To make this script available for use, you will need to build and publish it to Cloudflare using Wrangler:
Build and publish your project$ wrangler build
$ wrangler publish
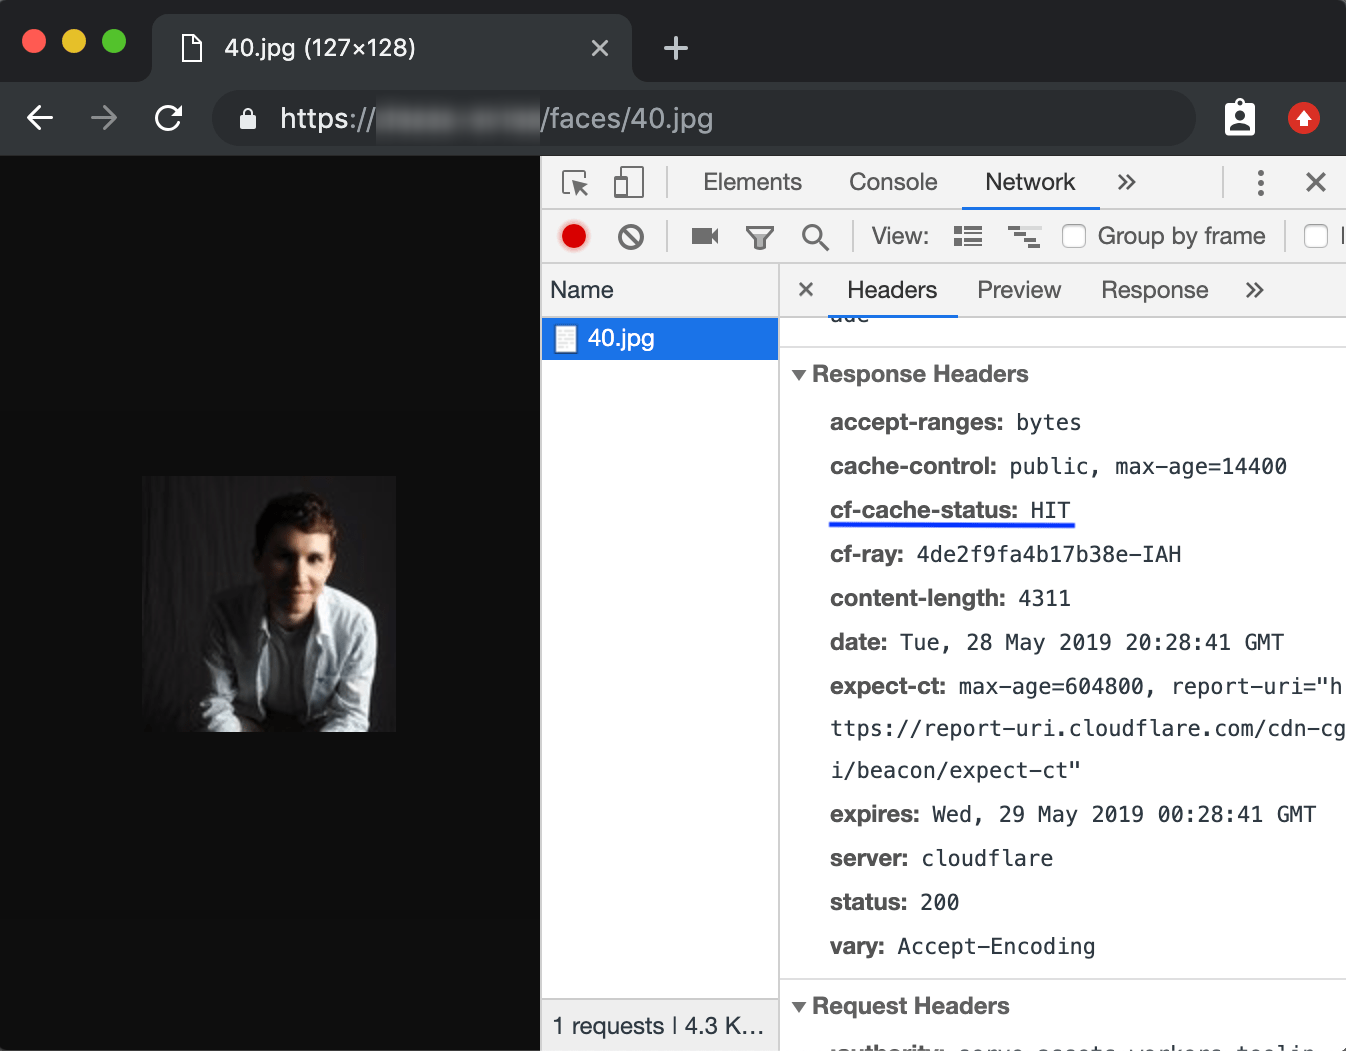
After deploying your project, open your browser to test retrieving your assets. For example, if your Workers project is deployed to the route myassets.com, going to the URL myassets.com/faces/1.jpg should show an uploaded asset. In addition, you can inspect the request in your browser to confirm that it is being cached. Cloudflare’s CDN will send a cf-cache-status header, with HIT or MISS, to indicate whether the content was cached or not:
Related resources
In this tutorial, you built and published a serverless function to Cloudflare Workers for serving assets from cloud storage. If you would like to review the full source code for this application, refer to the repository on GitHub.
If you want to get started building your own projects, review the existing list of Quickstart templates.