Using Kubernetes on GKE and AWS with Cloudflare Load Balancer
Overview
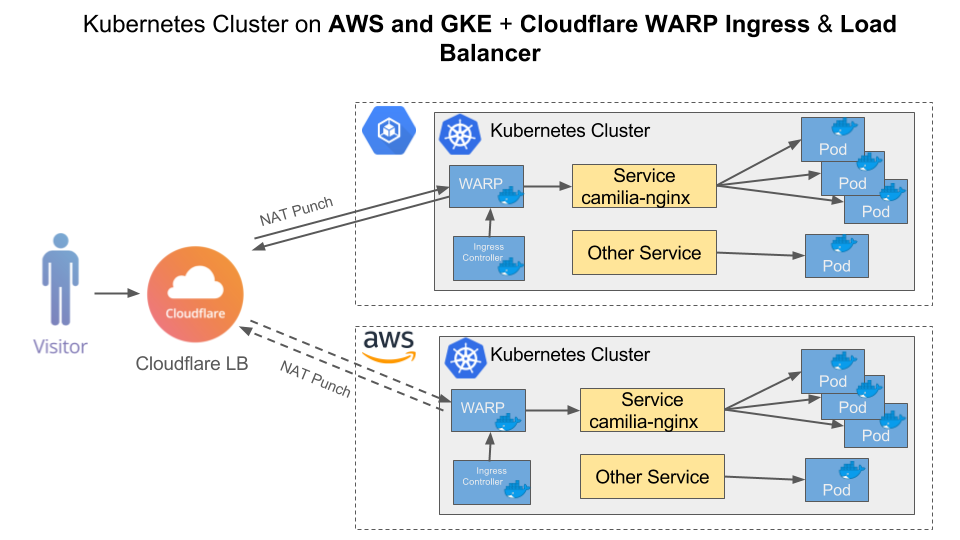
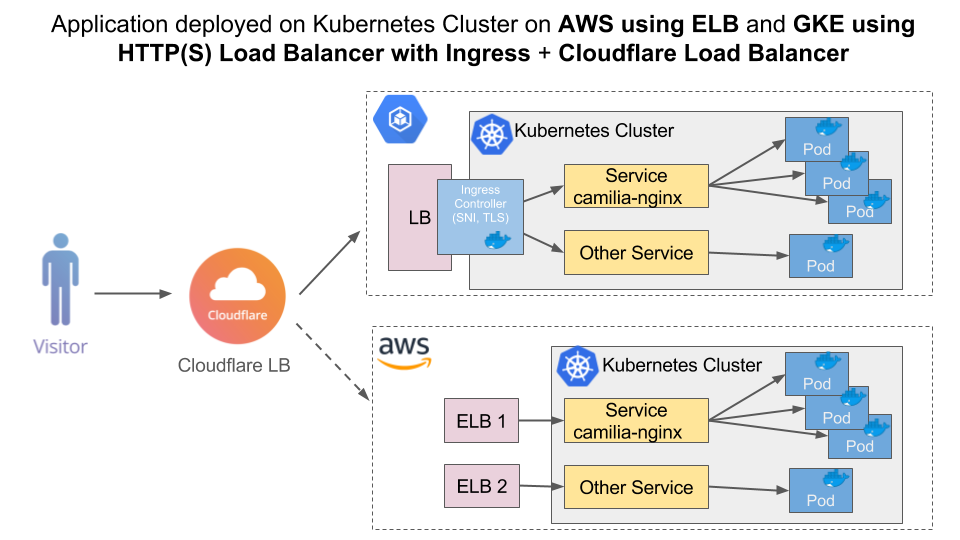
This tutorial will guide you through deploying simple application on Kubernetes cluster on Google Kubernetes Engine (GKE) and Amazon Web Services EC2 (AWS) and setting Cloudflare Load Balancer as a Global Load Balancer to distribute traffic intelligently across GKE and AWS. For simplicity we will be using one container cluster with 3 nodes.
The following diagram shows the output of this tutorial is deployed application running inside the Kubernetes cluster on GKE and AWS instances with Cloudflare Load Balancer distributing the traffic between them.
Key Concepts
Kubernetes
Pods: is a group of one or more containers (such as Docker containers), with shared storage/network, and a specification for how to run the containers. A pod’s contents are always co-located and co-scheduled, and run in a shared context. Pods are the smallest deployable units of computing that can be created and managed in Kubernetes. Node: is a worker machine in Kubernetes. A node may be a VM or physical machine, depending on the cluster. Each node has the services necessary to run pods and is managed by the master components. The services on a node include Docker, kubelet and kube-proxy. Cluster: A group of nodes firewalled from the Internet, that are the primary compute resources managed by Kubernetes. Cluster master: The cluster master runs the Kubernetes control plane processes, including the Kubernetes API server, scheduler, and core resource controllers. Cluster network: A set of links, logical or physical, that facilitate communication within a cluster according to the Kubernetes networking model. Examples of a Cluster network include Overlays such as flannel or SDNs such as OVS. Service: A Kubernetes Service that identifies a set of pods using label selectors. Unless mentioned otherwise, Services are assumed to have virtual IPs only routable within the cluster network. Kubernetes Engine assigns the external IP address to the Service resource—not the Deployment. The kubectl expose command creates a Service resource, which provides networking and IP support to your application’s Pods. Kubernetes Engine creates an external IP and a Load Balancer for your application Kubectl: A tool which is used to interact with the cluster. Kops: A simple tool provided by Kubernetes, that makes the creation of the cluster very easy. Ingress: An Ingress is a collection of rules that allow inbound connections to reach the cluster services. It can be configured to give services externally-reachable URLs, load balance traffic, terminate SSL, offer name based virtual hosting, and more. Users request ingress by POSTing the Ingress resource to the API server. Ingress Controller: An Ingress controller is responsible for fulfilling the Ingress, usually with a load balancer, though it may also configure your edge router or additional frontends to help handle the traffic in an HA manner.
Cloudflare Load Balancer
Load Balancer: a DNS hostname that you want traffic to be load-balanced for. Geo-based routing is also configured at the Load Balancer level Monitor: the configuration used to determine the health of servers. Monitors attached to Pools, so you can monitor different locations or groups of servers differently Pool: a group of servers or containers, each identified by their IP address or hostname. You can configure multiple Pools and configure failover priority Origins: A single IP or hostname that exist within a Pool. Multiple Origins in a single Pool will be load balanced by Cloudflare via round robin.
Set up
To run this tutorial, you’ll need the following:
- Access to Google Cloud Platform (GCP)
- Access to AWS
- Docker image
- A domain on Cloudflare (on the Free, Pro, or Business plan) with a Load Balancing subscription
Deploying a containerized web application on Google Kubernetes Engine
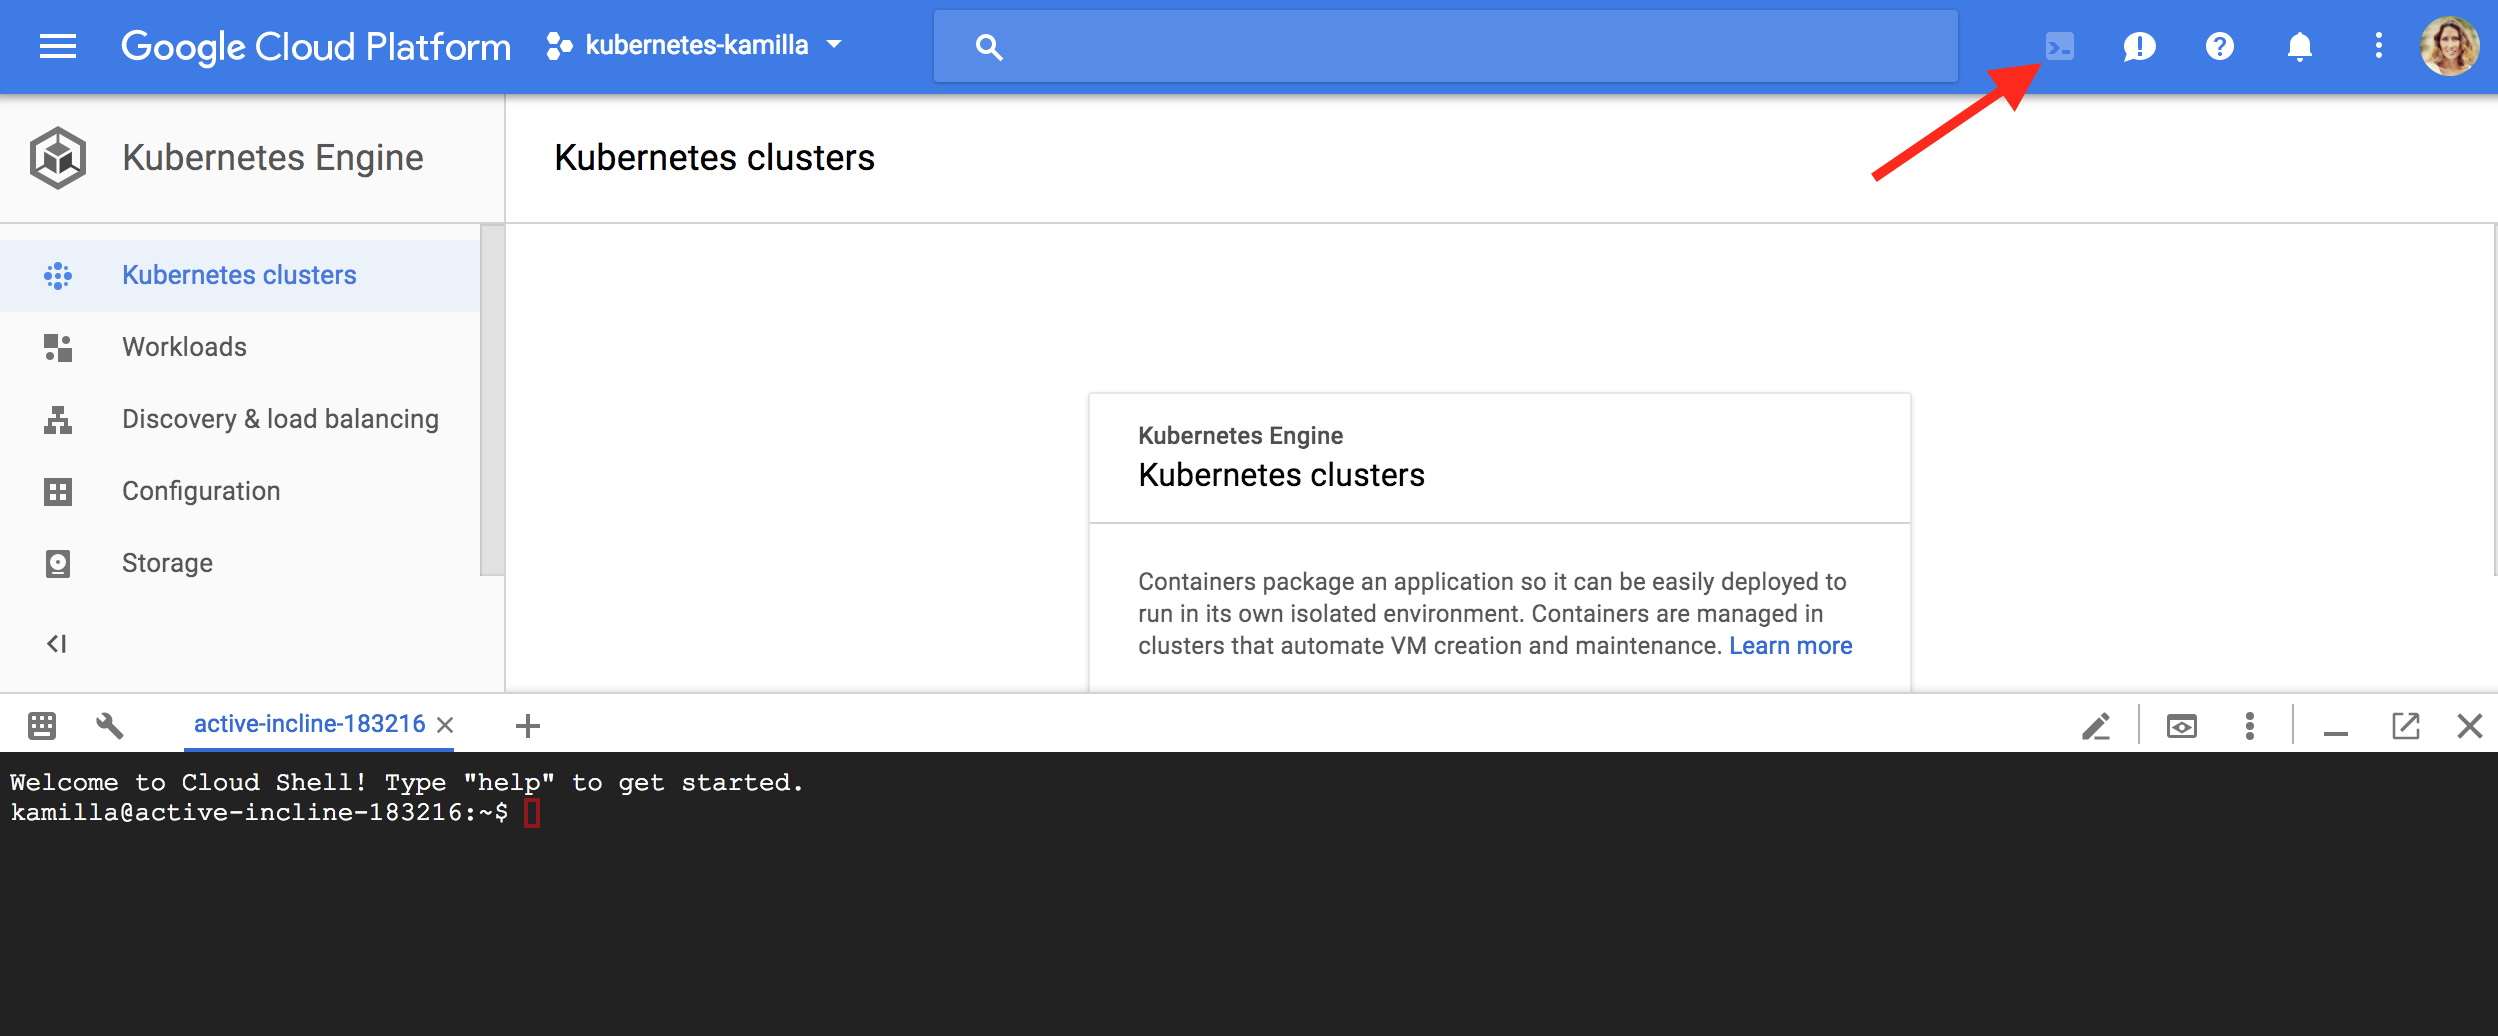
In this tutorial I am using Google Cloud Shell interface which comes preinstalled with the gcloud, docker, and kubectl command-line tools used below. If you use Cloud Shell, you don’t need to install these command-line tools on your workstation.
Go to the Kubernetes Engine. Click the Activate Google Cloud Shell button at the top of the console window. A Cloud Shell session opens inside a new frame at the bottom of the console and displays a command-line prompt.
Set default configuration values by running the following commands:
$ gcloud config set project PROJECT_ID_
$ gcloud config set compute/zone us-west1-a
Step 1: Create a container cluster
Create a container cluster to run the container image. A cluster consists of a pool of Compute Engine VM instances running Kubernetes.
Run the following command to create a three-node cluster (my cluster name is “camilia-cluster”)
$ gcloud container clusters create camilia-cluster --num-nodes=3It may take several minutes for the cluster to be created. Once the command has completed, run the following command and see the cluster’s three worker VM instances:
$ gcloud compute instances list
Step 2: Deploy application
Once your Kubernetes Engine cluster is setup, you can use Kubernetes to deploy applications to the cluster. Use the kubectl command-line tool to deploy and manage applications on a Kubernetes Engine cluster.
You can create, for example, a simple nginx docker container by using the following command (“camilia-nginx” is name for my deployment):
$ kubectl run camilia-nginx --image=nginx --port 80
To see the Pod created by the deployment, run:
kubectl get pods Step 3: Expose your application to the Internet
By default, the containers you run on Kubernetes Engine are not accessible from the Internet, because they do not have external IP addresses.
On GKE there are two ways how to make your HTTP(S) web server application publicly accessible:
- Expose the application to traffic from the Internet which will create a TCP Load Balancer and external IP address. TCP load balancer works for HTTP web servers. They are not designed to terminate HTTP(S) traffic as they are not aware of individual HTTP(S) requests. Kubernetes Engine does not configure any health checks for TCP load balancers.
- Expose the application as a service internally and create an Ingress resource with ingress controller which is responsible for creating HTTP(S) Load Balancer. HTTP(S) load balancer is designed to terminate HTTP(S) requests and can make better context-aware load balancing decisions. It supports features like customizable URL maps and TLS termination. Kubernetes Engine automatically configures health checks for HTTP(S) load balancers.
Option 2 is the recommended method for load balancing and offers more features. In this tutorial, we will be using Option 2 to create an Ingress resource with Ingress controller and HTTP(S) Load Balancer.
Step 3.1 Expose your nginx deployment as a service internally
To make the camilia-nginx deployment reachable within your container cluster you need to create a service resource:
$ kubectl expose deployment camilia-nginx --target-port=80 --type=NodePort
To verify the service was created and a node port was allocated run:
$ kubectl get service camilia-nginx
Step 3.2 Create an Ingress resource
To make your HTTP(S) web server application publicly accessible, you need to create an Ingress resource.
On Kubernetes Engine, Ingress is implemented using Cloud Load Balancing. When you create an Ingress in your cluster, Kubernetes Engine creates an HTTP(S) load balancer and configures it to route traffic to your application.
Below in an example of basic yaml configuration file which defines an Ingress resource that directs traffic to the service:
apiVersion: v1 kind: Service metadata: name: camilia-nginx annotations: cloud.google.com/load-balancer-type: “Internal” labels: app: echo spec: type: LoadBalancer ports: - port: 80 protocol: TCP
Create the yaml file by wrapping the content above using this command:
$ echo '... [your_yaml_text_here]' > basic-ingress.yaml
Then run:
$ kubectl apply -f basic-ingress.yaml
The Ingress controller running in your cluster is responsible for creating an HTTP(S) Load Balancer to route all external HTTP traffic to the service camilia-nginx. In environments other than GCE/Google Kubernetes Engine, you need to deploy a controller as a pod.
Find out the external IP address of the load balancer serving your application by running:
$ kubectl get ingress basic-ingress
This External IP (In my example, 35.227.204.26) is used for setting up pools with Cloudflare Load Balancer.
By default, Kubernetes Engine allocates ephemeral external IP addresses for HTTP applications exposed through an Ingress. In order to convert it to a static IP address, you can perform this action here.
Step 4: Scale up your application
To add two additional replicas to your Deployment (so, total number is three), run the following command:
$ kubectl scale deployment camilia-nginx --replicas=3
You can see the new replicas running on your cluster by running the following commands: kubectl get deployment camilia-nginx
$ kubectl get pods
HTTPS(S) Load Balancer you provisioned in the previous step will start routing traffic to these new replicas automatically.
Deploying a containerized web application using Kubernetes on AWS EC2 with Kops
Pre-requisites:
- Install Docker
- Install and configure AWS CLI with an AWS account
- Install Kops
- Install Kubectl
- Available domain name, eg. mydomain.com
- In the AWS console, add a policy for your user to access the AWS ECR. The IAM user to create the Kubernetes cluster must have the following permissions: AmazonEC2FullAccess, AmazonRoute53FullAccess, AmazonS3FullAccess, IAMFullAccess, AmazonVPCFullAccess
*Recently Amazon announced support for the Kubernetes container orchestration system on top of its Elastic Container Service (ECS). Click Amazon EKS for signing up for the preview.
Step 1: Setting the AWS environment
By using AWS CLI we need two resources created on AWS before we can create Kubernetes cluster:
- S3 bucket to store information about created cluster and it’s configuration.
- Available domain (route53 domain) which is used to run the container on. I am using my domain usualwebsite.com where for Kubernetes cluster on AWS I will use subdomain k8saws.usualwebsite.com
Let’s create a S3 bucket. I used the following name “camilia-k8s-state”:
$ aws s3api create-bucket --bucket camilia-k8s-state --region us-east-1
You can export KOPS_STATE_STORE=s3://bucket-name and then kops will use this location by default:
$ export KOPS_STATE_STORE=s3://camilia-k8s-state
Now let’s create a route 53 domain for the cluster. Kops uses DNS for discovery, both inside the cluster and so that you can reach the kubernetes API server from clients. It should be a valid DNS name. A Route53 hosted zone can serve subdomains. My hosted zone is “k8saws.usualwebsite.com”. ```sh $ aws route53 create-hosted-zone –name k8saws.usualwebsite.com –caller-reference 1
It will automatically create four name server (NS) records. You must then set up your NS records in the parent domain, so that records in the domain will resolve.
As Authoritative DNS for my domain usualwebsite.com I am using Cloudflare DNS. Just simply [add four NS records](/dns/manage-dns-records/how-to/create-dns-records/) under your DNS provider.
To check if your records were added correctly run the following command:
```sh$ dig ns k8saws.usualwebsite.com Step 2: Creating the cluster
Run “kops create cluster” to create your cluster configuration:
$ kops create cluster --zones us-east-1a k8saws.usualwebsite.com
kops will create the configuration for your cluster and save it on S3.
!Note that it only creates the configuration, it does not actually create the cloud resources - you’ll do that in the next step with a kops update cluster. This give you an opportunity to review the configuration or change it.
Finally run the following command to create your cluster in AWS:
$ kops update cluster k8saws.usualwebsite.com --yes
That takes a few seconds to run, but then your cluster will likely take a few minutes to actually be ready. Let’s login to AWS console to see created EC2 instances. kops created for us one parent node and two children. This is the default config for kops. You can change it by setting –node-count parameter.
For more information about the cluster run:
$ kubectl cluster-info
To check nodes:
$ kubectl get nodes
Step 3: Deploying application
After you created a Kubernetes Engine cluster, you use Kubernetes to deploy applications to the cluster. You can create, for example, a simple nginx docker container by using the following command (“camilia-nginx” is name for my deployment):
$ kubectl run camilia-nginx --image=nginx --port=80
A pod was created and scheduled to one of the children nodes. To check created pod run the following command:
kubectl get pods
Step 4: Expose your application to the Internet
By default, the containers you run on Kubernetes Engine are not accessible from the Internet, because they do not have external IP addresses. You need to expose the application to traffic from the Internet which will assign an external IP address to the service and create AWS Elastic Load Balancer (ELB).
To expose your application to traffic from the Internet run the following command:
$ kubectl expose deployment camilia-nginx --type=LoadBalancer --name aws-http-lb
For checking external IP that was provisioned for the application run the following command:
$ kubectl get services
$ kubectl describe service aws-http-lb
The External IP address (in my example a2a0848d7d49611e7bfe20206b4bee2f-1914840563.us-east-1.elb.amazonaws.com) is used for setting up pools with Cloudflare Load Balancer.
Step 5: Scale up your application
It’s very easy to scale applications with Kubernetes. Just run the following command:
$ kubectl scale --replicas=3 deployment/camilia-nginx
It created 2 more pods, making sure that are 3 identical instances of our applications running. You can check it with the following command:
$ kubectl get pods
All threes pods are running under AWS Elastic Load Balancer.
We have our applications deployed on both clouds. Now we can set up Cloudflare Load Balancer.
Deprovisioning:
Delete the Service:
$ kubectl delete service camilia-nginx
Delete the container cluster:
$ gcloud container clusters delete camilia-cluster
Delete the Ingress:
$ kubectl delete ingress basic-ingress```
___
## Creating Cloudflare Load Balancer
For creating Cloudflare Load Balancer we will use the following IP addresses which we obtained from the steps above:
- Google Load Balancer IP address: 35.227.204.26- AWS Load balancer IP address:a2a0848d7d49611e7bfe20206b4bee2f-1914840563.us-east-1.elb.amazonaws.com
### Step 1: Create Hostname
[Create a load balancer](/load-balancing/how-to/create-load-balancer/) and give it a public hostname. If you are Load Balancing non-HTTP(S) services set it to non-proxied mode by clicking on the cloud icon (orange -> grey).
For my Load Balancer I used hostname _cloudflarelb.usualwebsite.com_
### Step 2: Create Origin Pools
Let’s [create two origin pools](/load-balancing/how-to/create-pool/):
- GKE: - Pool Name: gke-us-west1 - Origin name: gke - Origin Address: 35.227.204.26- AWS: - Pool Name: aws-us-east-1 - Origin name: aws - Origin Address:a2a0848d7d49611e7bfe20206b4bee2f-1914840563.us-east-1.elb.amazonaws.com
My primary pool is gke-us-west1 with failover to aws-us-east-1. All my traffic goes to GKE. In case of GKE failure the traffic will be automatically rerouted to aws-us-east-1 pool.
### Step 3: Create Health Checks
We’ll also [create a health check](/load-balancing/how-to/create-monitor/) here to check the health of the service running on our nodes. The default settings should be OK to begin with, but more complex health checks can also be customized under “Advanced Monitoring Settings”.
Save the pool and wait a few moments for the health check to detect the pool as healthy. If it does not confirm that the checks are being run against the correct endpoint and are reachable by the public Internet.
### Step 4: Set up Geo Routing
I [set up geo steering](/load-balancing/understand-basics/traffic-steering/steering-policies/geo-steering/) to have the traffic routed based on location. For this tutorial for specific regions I have set Geo Routing to route the requests from the following:
- Eastern North America is routed to AWS- Oceania is routed to GKE
### Step 5: Configure DNS
Now for my www.usualwebsite.com I will update DNS record to point to my Load Balancer: _www.usualwebsite.com CNAME to cloudflarelb.usualwebsite.com_
### Step 6: Review Traffic
#### **Geo-Routing**
By using [GeoScreenshot](https://www.geoscreenshot.com/) I can check from multiple locations what cloud provider my website is served from.
___
## Argo Tunnel Ingress Controller
In addition to Cloudflare Load Balancer, [Cloudflare Tunnel](/cloudflare-one/connections/connect-apps/) establishes an encrypted tunnel to the Cloudflare edge without needing to open ports in the firewall or have a public IP. This is perfect for NATted environments such as a home or office network, or to allow inbound traffic into egress-only services.
### **Cloudflare TunnelIngress**
To make it easy to work with Kubernetes we have developed a Cloudflare Tunnel Ingress. It implements an ingress controller using Cloudflare Tunnel tunnel to connect a Cloudflare managed URL to a Kubernetes service.
The Cloudflare Tunnel controller will manage ingress tunnels in a single namespace of the cluster. Multiple controllers can exist in different namespaces, with different credentials for each namespace.