Configuring Cloudflare Rate Limiting (previous version)
Overview
Cloudflare Rate Limiting automatically identifies and mitigates excessive request rates for specific URLs or for an entire domain. Request rates are calculated locally for individual Cloudflare data centers. The most common uses for Rate Limiting are DDoS protection, Brute-force attack protection, and to limit access to forum searches, API calls, or resources that involve database-intensive operations at your origin.
Once an individual IPv4 address or IPv6 /64 IP range exceeds a rule threshold, further requests to the origin web server are blocked with an HTTP 429 response that includes a Retry-After header to indicate when the client can resume sending requests.
Rate limiting and SEO
For customers using the previous version of rate limiting rules, cached resources and known Search Engine crawlers are exempted from your rate limiting rules. Therefore, they do not affect your website’s SEO ranking.
However, if you are using the new version of rate limiting rules, you must ensure that your rate limiting rules are not affecting known good bots, so that the SEO ranking of your website is not affected. For more information, refer to Improve SEO.
Analytics
View rate limiting analytics in Analytics > Security. Rate Limiting analytics uses solid lines to represent traffic that matches simulated requests and dotted lines to portray actual blocked requests. Logs generated by a Rate Limiting rule are only visible to Enterprise customers via Cloudflare Logs.
Cloudflare returns an HTTP 429 error for blocked requests. Details on blocked requests per location are provided to Enterprise customers under Status codes in the analytics dashboard available at Analytics > Traffic.
Rate Limiting allowances per plan
The number of allowed Rate Limiting rules depends on the domain’s plan:
| Plan | Rules | Rules matching response headers | Actions | Action Duration | Request Period |
|---|---|---|---|---|---|
| Free | 1 | 1 | Block | 1 minute or 1 hour | 10 seconds or 1 minute |
| Pro | 10 | 1 | Block, Interactive Challenge, JS Challenge, Managed Challenge, or Log | 1 minute or 1 hour | 10 seconds or 1 minute |
| Business | 15 | 10 | Block, Interactive Challenge, JS Challenge, Managed Challenge, or Log | 1 minute, 1 hour, or 24 hours | 10 seconds, 1 minute, or 10 minutes |
| Enterprise | 100 | 10 | Block, Interactive Challenge, JS Challenge, Managed Challenge, or Log | Any duration entered between 10 seconds and 86400 seconds (24 hours) | Any value entered between 10 seconds and 3600 seconds (1 hour). |
Cloudflare Rate Limiting supports multiple levels of configuration control depending on the domain’s Cloudflare plan. The table below maps out what you can do based on your plan:
| Order | Task | Available in |
|---|---|---|
| 1 | Configure a basic Rate Limiting rule | All plans |
| 2 | Configure Advanced Criteria | Business and Enterprise plans |
| 3 | Configure Advanced Response | Business and Enterprise plans |
| 4 | Configure the Bypass option | Enterprise plan |
Components of a Rate Limiting rule
A Rate Limiting rule consists of three distinct components. Click a component below to expand the details:
Incoming requests are matched based on:
The request path
For example:
http://example.com/examplehttp://example.com/example/\*
The request path is case insensitive. Patterns cannot match content after query strings (?) or anchors (#). An asterisk (*) matches any sequence of characters, including an empty sequence. For example:
- *.example.com/* matches any path on any subdomain of example.com
- *example.com/example.html matches example.html on example.com or any subdomain of example.com
- * matches any page on your site
A request for example.com/path is not the same as example.com/path/. The only exception to this rule is the homepage, example.com matches example.com/.
The request scheme
HTTP or HTTPS. If none is specified, both are matched, and the rule will list _ALL_.
The request method
POST or GET. If none is specified, all methods are matched, and the rule will list _ALL_.
(optional) The origin response code
For example, match a Rate Limiting rule only when an HTTP 401 or 403 is returned from the origin web server. A triggered rule matching the response code criteria blocks subsequent requests from that client regardless of origin response code.
A rule can match on the number and time period of all requests coming from the same client:
Number of requests
Specify a minimum of two requests. For single request blocking, make the path unavailable; for example, by configuring your origin web server to return a 403.
Request period
A rule triggers once a client’s requests exceed the threshold for the specified duration.
Rule mitigations consist of:
Mitigation action
Rate limit actions are based on the domain plan as mentioned above in Rate Limiting allowances per plan:
- Block - Cloudflare issues an HTTP 429 error when the threshold is exceeded.
- Interactive Challenge - Visitor must pass an Interactive Challenge. If passed, Cloudflare allows the request.
- JS Challenge - Visitor must pass a Cloudflare Javascript Challenge. If passed, Cloudflare allows the request.
- Log - Requests are logged in Cloudflare Logs. This helps test rules before applying to production.
Ban duration
Setting a timeout shorter than the threshold causes the API to automatically increase the timeout to equal the threshold.
Rate Limiting visitors receive a default HTML page if a custom error page is not specified. In addition, Business and Enterprise customers can specify a response in the rule itself, refer to Task 3: Configure Advanced Response below.
Identify rate-limit thresholds
To identify a general threshold for Cloudflare Rate Limiting, divide 24 hours of uncached website requests by the unique visitors for the same 24 hours. Then, divide by the estimated average minutes of a visit. Finally, multiply by 4 (or larger) to establish an estimated threshold per minute for your website. A value higher than 4 is fine since most attacks are an order of magnitude above typical traffic rates.
To identify URL rate limits for specific URLs, use 24 hours of uncached requests and unique visitors for the specific URL. Adjust thresholds based on user reports and your own monitoring.
Task 1: Configure a basic Rate Limiting rule
Click to expand details on creating the two common types of Cloudflare Rate Limiting rule.
Rate Limiting features a one-click Protect your login tool that creates a rule to block the client for 15 minutes when sending more than 5 POST requests within 5 minutes. This is sufficient to block most brute-force attempts.
- Log into your Cloudflare account.
- Select the domain to protect.
- Navigate to Security > WAF > Rate limiting rules.
- Under Rate Limiting, click Protect your login.
- Enter Rule Name and Enter your login URL in the Protect your login dialog that appears.
- Click Save.
- The Rule Name appears in your Rate Limiting rules list.
1. Log in to the Cloudflare dashboard.
2. Select the appropriate domain.
3. Navigate to Security > WAF > Rate limiting rules.
4. Click Create rate limiting rule. A dialog opens where you specify the details of your new rule.
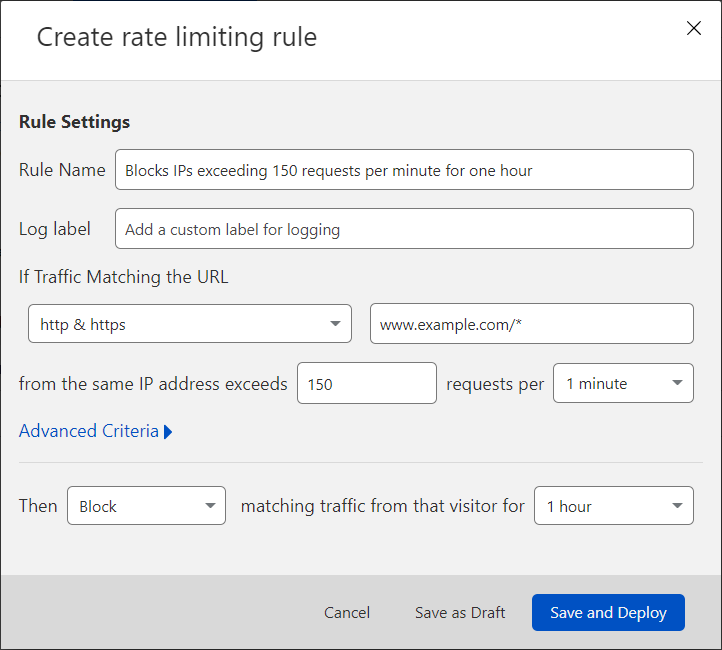
5. Enter a descriptive Rule Name.
6. For If Traffic Matching the URL, select an HTTP scheme from the dropdown as well as a URL.
7. In from the same IP address exceeds, enter an integer greater than 1 to represent the number of requests in a sampling period.
8. For requests per, select the sampling period (the period during which requests are counted). Domains on Enterprise plans can enter manually any duration between 10 seconds and 3600 seconds (1 hour).
9. For the Then dropdown, pick one of the available actions based on your plan. Review the Rule Mitigation section of Components of a Rate Limiting Rule above for details.
10. If you selected Block or Log, for matching traffic from that visitor for, select how long to apply the option once a threshold has been triggered. Domains on Enterprise plans can enter any value between 10 seconds and 86400 seconds (24 hours).
11. To activate your new rule, click Save and Deploy.
The new rule appears in the rate limiting rules list.
In general, when setting a lower threshold:
- Leave existing rules in place and add a new rule with the lower threshold.
- Once the new rule is in place, wait for the action duration of the old rule to pass before deleting the old rule.
When setting a higher threshold (due to legitimate client blocking), increase the threshold within the existing rule.
Task 2: Configure Advanced Criteria (only Business and Enterprise plans)
The Advanced Criteria option configures which HTTP methods, header responses, and origin response codes to match for your Rate Limiting rule.
To configure your advanced criteria for a new or existing rule, follow these steps:
1. Expand Advanced Criteria.
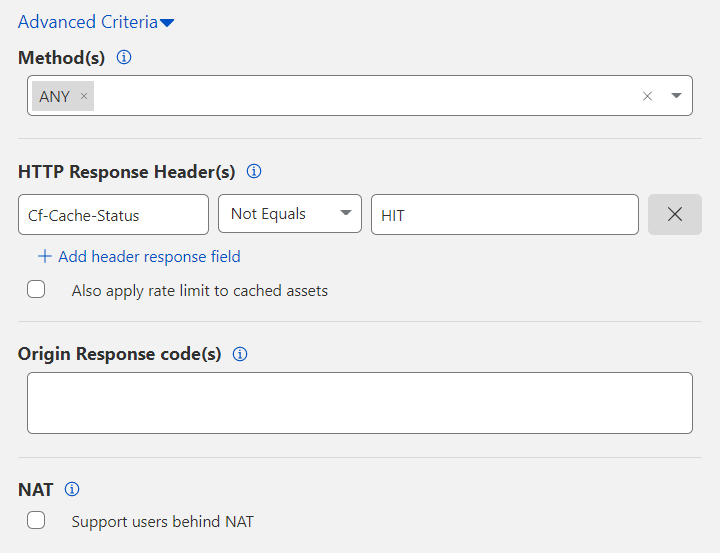
2. Select a value from the Method(s) dropdown. The default value is ANY, which matches all HTTP methods.
3. Filter by HTTP Response Header(s). Click Add header response field to include headers returned by your origin web server.
The CF-Cache-Status header appears by default so that Cloudflare serves cached resources rather than rate limit those resources. To also rate limit cached resources, remove this header by clicking the X button or enable Also apply rate limit to cached assets.
If you have more than one header under HTTP Response Header(s), an AND boolean logic applies. To exclude a header, use the Not Equals option. Each header is case insensitive.
4. Under Origin Response code(s), enter the numerical value of each HTTP response code to match. Separate two or more HTTP codes with a comma (for example: 401, 403).
5. (Optional) Configure additional rate limiting features, based on your plan.
6. Click Save and Deploy.
Task 3: Configure Advanced Response (only Business and Enterprise plans)
The Advanced Response option configures the information format returned by Cloudflare when a rule’s threshold is exceeded. Use Advanced Response when you wish to return static plain text or JSON content.
To configure a plain text or JSON response:
1. Expand Advanced Response.
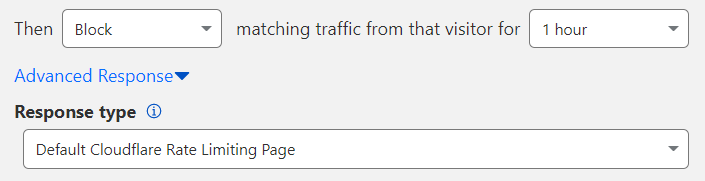
2. Select a Response type format other than the default: Custom JSON or Custom TEXT.
3. Enter the plain text or JSON response you wish to return. The maximum response size is 32 kB.
4. (Optional) Configure additional rate limiting features, based on your plan.
5. Click Save and Deploy.
Using a custom HTML page or a redirect
If you wish to display a custom HTML page, configure an custom page for HTTP 429 errors (“Too many requests”) in the dashboard. Cloudflare will display this page when you select “Default Cloudflare Rate Limiting Page” in Response type (the default value for the field).
You can use this method to redirect a rate-limited client to a specific URL:
1. Create an HTML page on your server that will redirect to the final URL of the page you wish to display. Include a meta refresh tag in the page content, like in the following example:
<!doctype html>
<html>

<head>  <meta charset="utf-8">  <title>Custom RL page</title>  <meta http-equiv="refresh" content="0; url='https://yourzonename/block'" />
</head>

<body> </body>

</html>
Take note of the public URL of the page you created.
2. In the Cloudflare dashboard, navigate to Account Home > Configurations > Custom Pages.
3. Under 429 errors, click Custom Pages.
4. Enter the URL of the page you created on your server — the page containing the meta refresh tag — and click Publish.
Follow the same approach if you wish to return plain text or JSON content but the response is larger than 32 kB. In this case, the redirect URL would be the URL of the plain text or JSON resource you would like to display.
Notes:
- Your Rate Limiting rule must not match the redirect URL you included in the custom HTML page for 429 errors.
- To protect from denial-of-service attacks, the page for the redirect should only include resources cached by Cloudflare.
Task 4: Configure the Bypass option (Enterprise plans only)
Bypass creates an allowlist or exception so that no actions apply to a specific set of URLs even if the rate limit is matched. Configure a Bypass via the following steps:
1. Expand Bypass.
2. In Bypass rule for these URLs, enter the URL(s) to exempt from the rate limiting rule. Enter each URL on its own line. An HTTP or HTTPS specified in the URL is automatically removed when the rule is saved and instead applies to both HTTP and HTTPS.
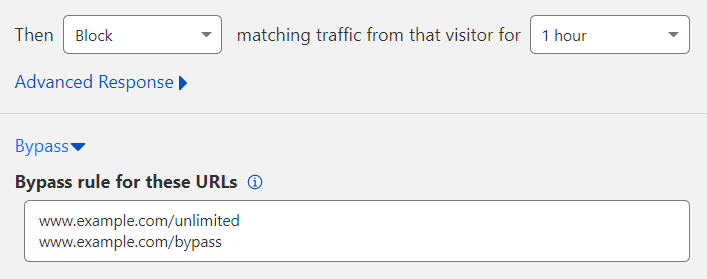
3. (Optional) Configure additional rate limiting features, based on your plan.
4. Click Save and Deploy.
Order of rule execution
Use case 1: If a request matches with both rules below,
- rule 1: matching with test.example.com
- rule 2: matching with *.example.com*
or
- rule 1: matching with *.example.com*
- rule 2: matching with test.example.com
then rule 2 will always trigger first because it was created last.
Use case 2: By removing the asterisk (*) at the end of the domain, rule execution will depend on which rule was created the last**.**
- rule 1: matching with test.example.com
- rule 2: matching with *.example.com
rule 2 above triggers first if a request matches both rules.
- rule 1: matching with *.example.com
- rule 2: matching with test.example.com
rule 2 above triggers first if a request matches both rules.