Honeycomb Pages Plugin
The Honeycomb Pages Plugin automatically sends traces to Honeycomb for analysis and observability.
Installation
$ npm install @cloudflare/pages-plugin-honeycomb
Usage
The following usage example uses environment variables you will need to set in your Pages project settings.
functions/_middleware.tsimport honeycombPlugin from "@cloudflare/pages-plugin-honeycomb";

export const onRequest: PagesFunction<{  HONEYCOMB_API_KEY: string  HONEYCOMB_DATASET: string
}> = (context) => {  return honeycombPlugin({    apiKey: context.env.HONEYCOMB_API_KEY,    dataset: context.env.HONEYCOMB_DATASET,  })(context);
}
Alternatively, you can hard-code (not advisable for API key) your settings the following way:
functions/_middleware.tsimport honeycombPlugin from "@cloudflare/pages-plugin-honeycomb";

export const onRequest = honeycombPlugin({  apiKey: "YOUR_HONEYCOMB_API_KEY",  dataset: "YOUR_HONEYCOMB_DATASET_NAME",
});
This Plugin is based on the @cloudflare/workers-honeycomb-logger and accepts the same configuration options.
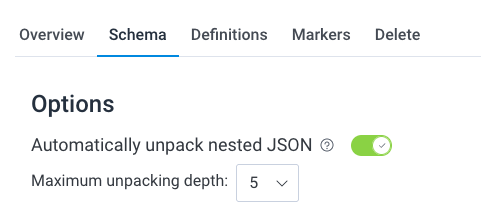
Ensure that you enable the option to Automatically unpack nested JSON and set the Maximum unpacking depth to 5 in your Honeycomb dataset settings.

Additional context
data.honeycomb.tracer has two methods for attaching additional information about a given trace:
data.honeycomb.tracer.logwhich takes a single argument, aString.data.honeycomb.tracer.addDatawhich takes a single argument, an object of arbitrary data.
More information about these methods can be seen on @cloudflare/workers-honeycomb-logger’s documentation.
For example, if you wanted to use the addData method to attach user information:
functions/admin/_middleware.tsimport type { PluginData } from "@cloudflare/pages-plugin-honeycomb";

export const onRequest: PagesFunction<unknown, any, PluginData> = async ({  data,  next,  request}) => {  // Authenticate the user from the request and extract user's email address  const email = await getEmailFromRequest(request);
  data.honeycomb.tracer.addData({ email });
  return next();
};