Okta
Okta provides cloud software that helps companies manage and secure user authentication to modern applications, and helps developers build identity controls into applications, website web services, and devices. You can integrate Okta with Cloudflare Zero Trust and build rules based on user identity and group membership. Cloudflare Zero Trust supports Okta integrations using either the OIDC (default) or SAML protocol.
Set up Okta as an OIDC provider
- On your Okta admin dashboard, navigate to Applications > Applications.
- Select Create App Integration.
- For the Sign-in method, select OIDC - OpenID Connect.
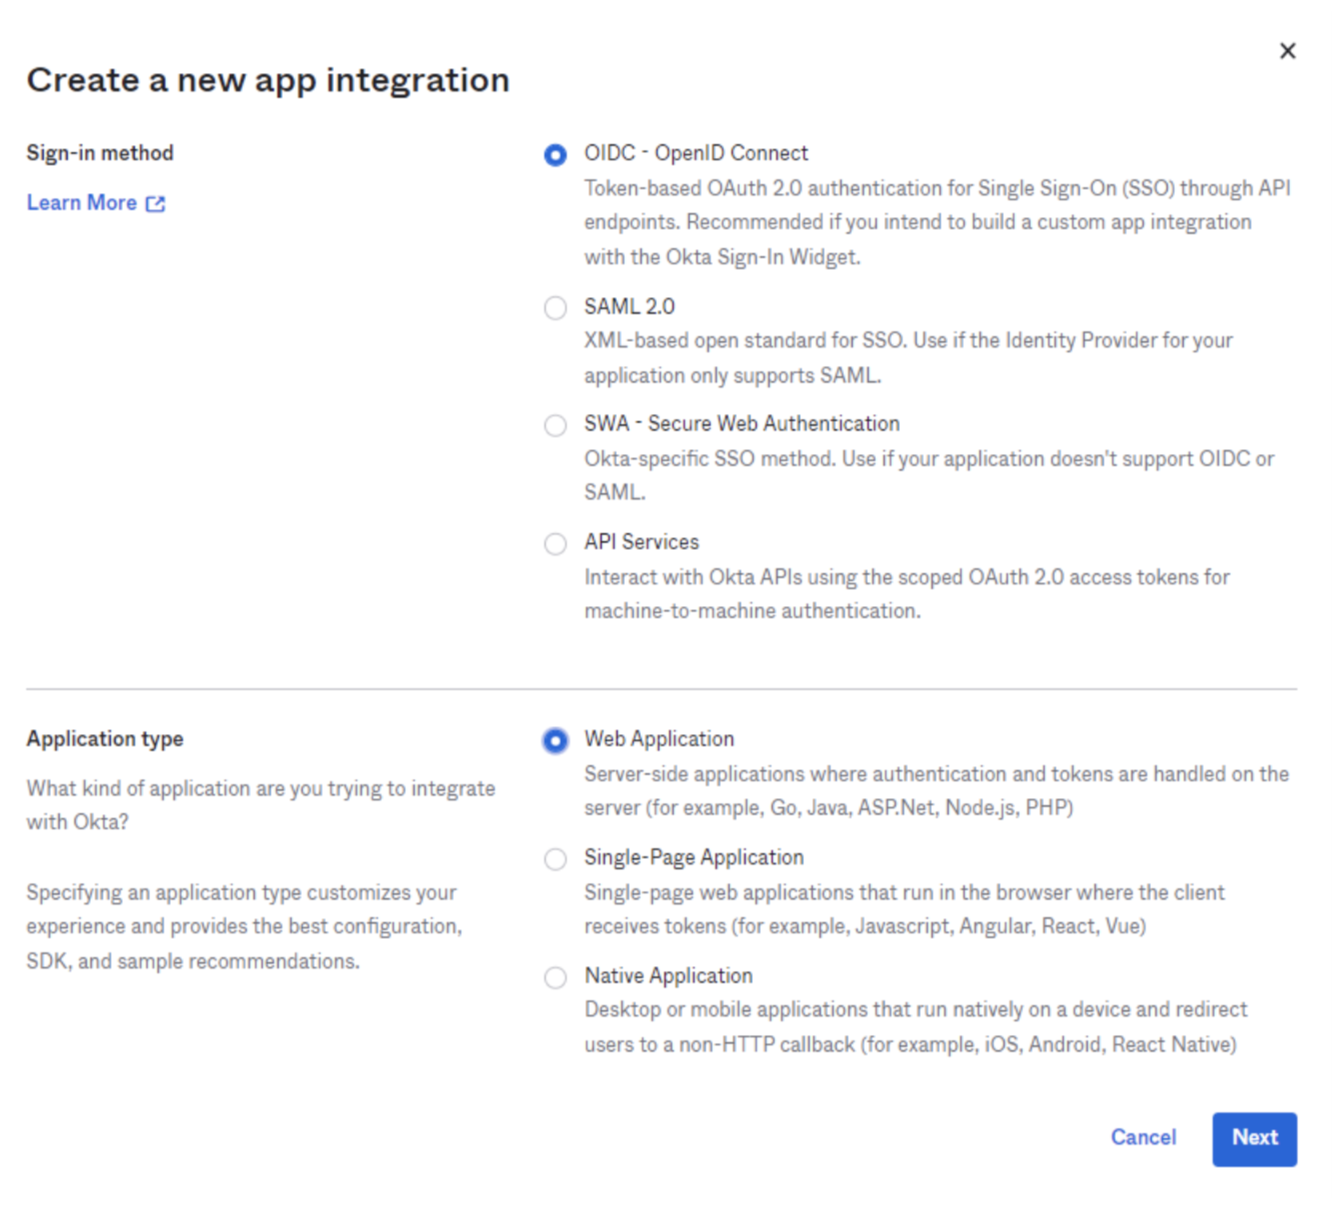
For the Application type, select Web Application. Select Next.
Enter any name for the application. In the Sign-in redirect URIs field, input your team domain followed by this callback at the end of the path:
/cdn-cgi/access/callback. For example:https://<your-team-name>.cloudflareaccess.com/cdn-cgi/access/callbackChoose the desired Assignment option and select Save.
From the application view, navigate to the Sign On tab.
Scroll down to the OpenID ConnectID Token and select Edit.
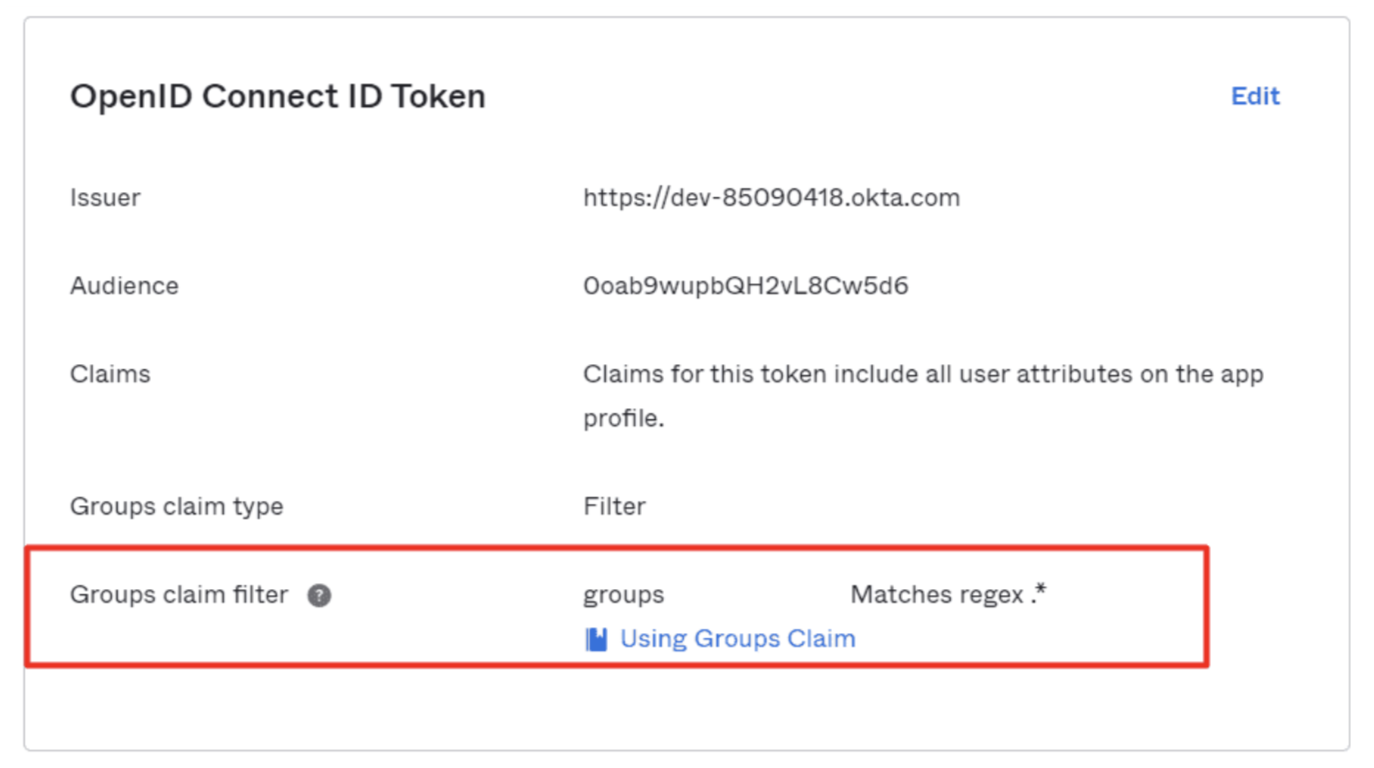
Set the Groups claim filter to Matches regex and its value to
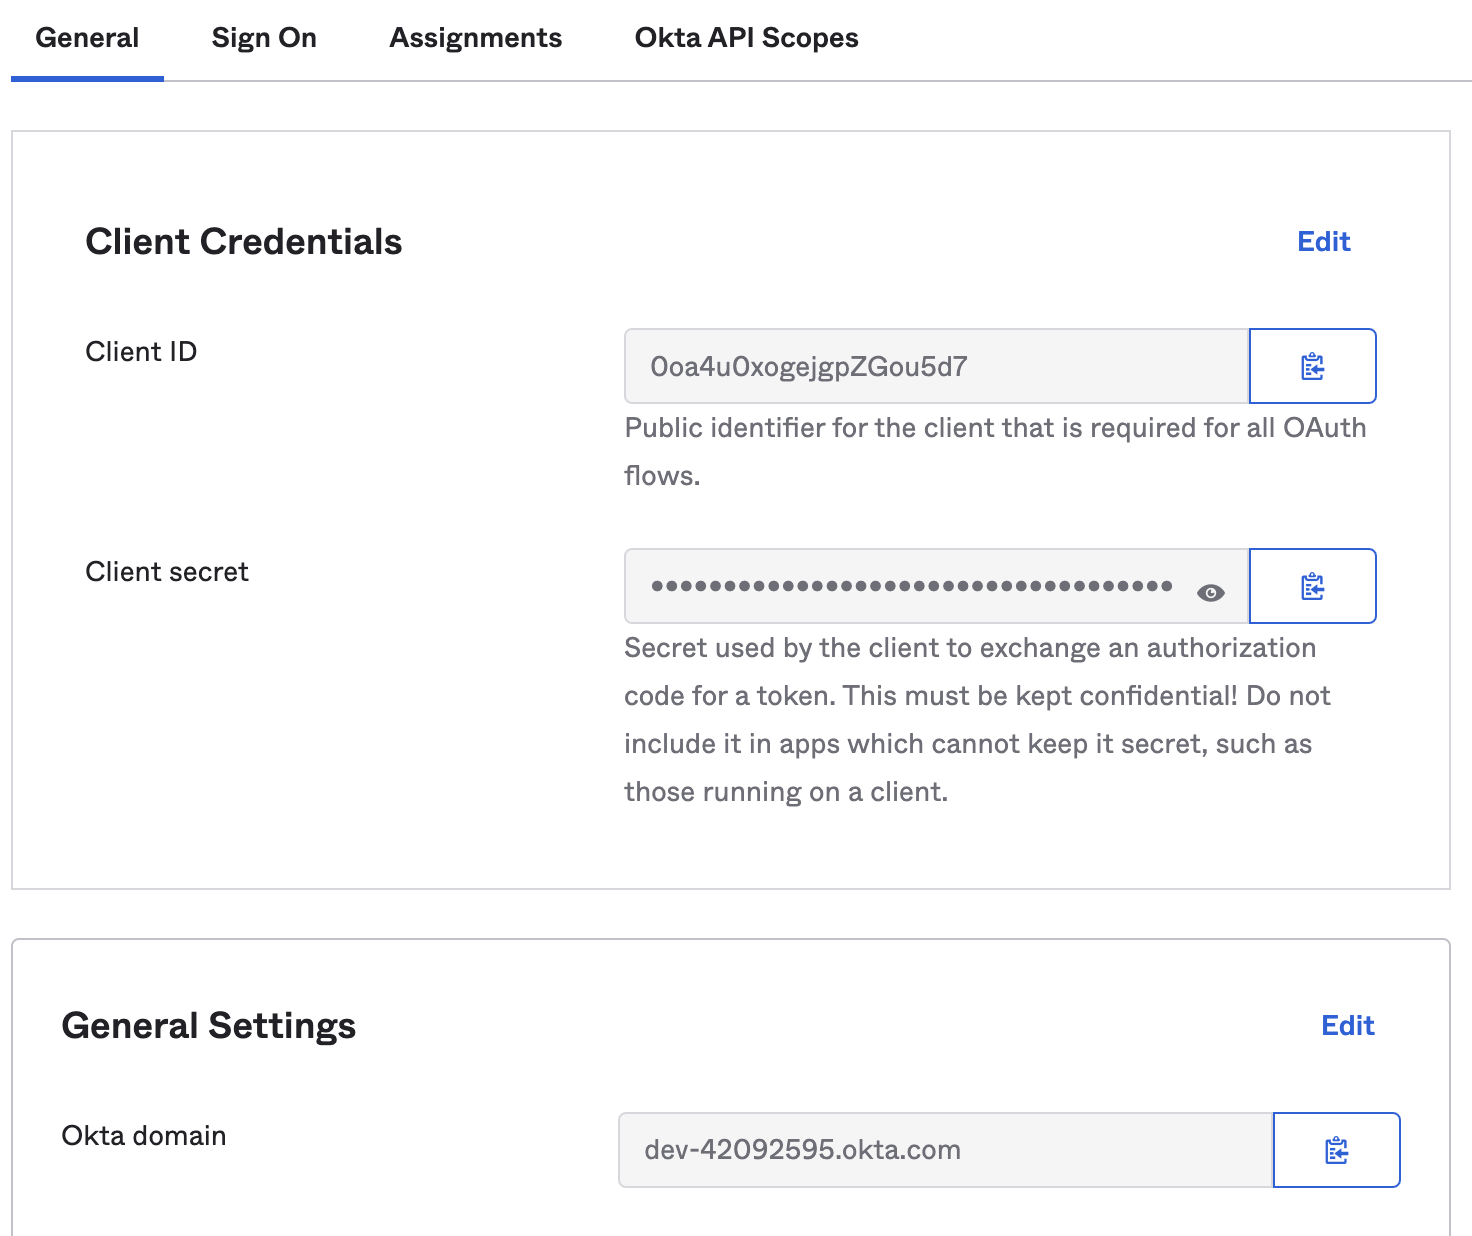
.*.In the General tab, copy the Client ID, Client secret, and Okta domain.
In Zero Trust, navigate to Settings > Authentication.
Under Login methods, select Add new. Select Okta as your identity provider.
Fill in the following information:
- Name: Name your identity provider
- App ID: Enter your Okta Client ID.
- Client secret: Enter your Okta Client secret.
- Okta account URL: Enter your Okta domain, for example
https://<your-domain>.okta.com.
(Optional) Create an Okta API token and enter it in Zero Trust (the token can be read-only). This will prevent your Okta groups from failing if you have more than 100 groups.
(Optional) Enable Proof of Key Exchange (PKCE). PKCE will be performed on all login attempts.
Select Save.
To test that your connection is working, select Test.
Synchronize users and groups
The Okta OIDC integration supports the System for Cross-domain Identity Management (SCIM) protocol. With SCIM, Cloudflare Access can automatically deprovision users after they are deactivated in the identity provider and display synchronized group names in the Access policy builder.
To synchronize users and groups between Access and Okta, you need two separate app integrations in Okta:
- The Okta OIDC connector you created when adding Okta as an identity provider.
- A second Okta application of type SCIM 2.0 Test App (Header Auth). This is technically a SAML app but is responsible for sending user and group info via SCIM provisioning.
1. Enable SCIM in Zero Trust
In Zero Trust, go to Settings > Authentication.
Locate the IdP you want to synchronize and select Edit.
Select Enable SCIM.
(Optional) Enable the following settings:
- Enable user deprovisioning: Revoke a user’s active session when they are removed from the SCIM application in the IdP.
- Remove user seat on deprovision: Remove a user’s seat from your Zero Trust account when they are removed from the SCIM application in the IdP.
- Enable group membership change reauthentication: Revoke a user’s active session when their group membership changes in the IdP. This will revoke all active Access sessions and prompt for reauthentication for any Gateway WARP session policies. Access will read the user’s updated group membership when they reauthenticate.
Select Save.
Copy the SCIM Endpoint and SCIM Secret. You will need to enter these values into the IdP.
2. Configure SCIM in Okta
On your Okta admin dashboard, navigate to Applications > Applications.
Select Browse App Catalog.
Search for
SCIM Header Authand select SCIM 2.0 Test App (Header Auth).Select Add Integration.
On the General Settings tab, name your application and select Next.
On the Sign-on Options tab, ensure that SAML 2.0 is selected. Select Done to create the integration.
On the Provisioning tab, and select Configure API Integration.
Select Enable API integration.
In the Base URL field, enter the SCIM Endpoint obtained from Zero Trust.
In the API Token field, enter the SCIM Secret obtained from Zero Trust.
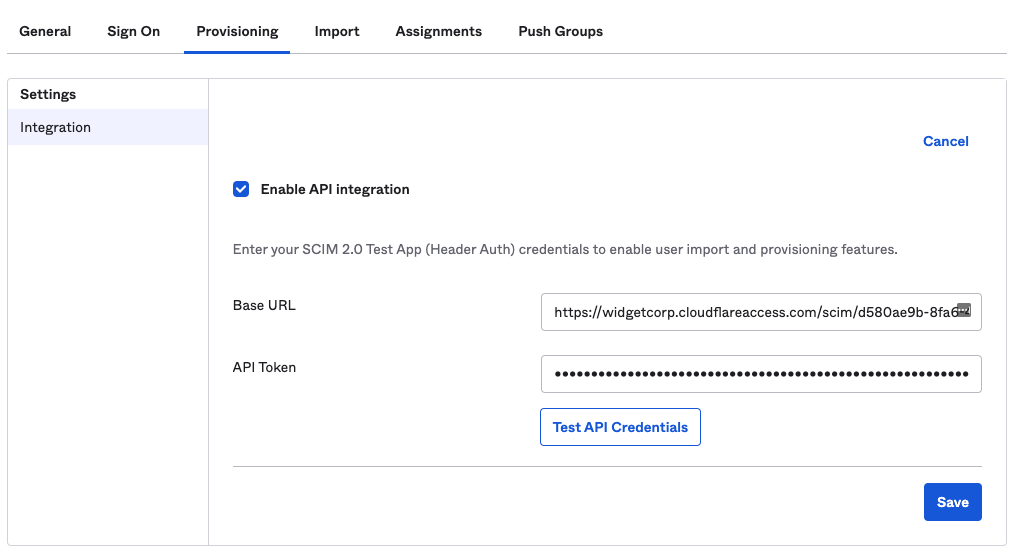
Select Test API Credentials to ensure that the credentials were entered correctly. Select Save.
On the Provisioning tab, select Edit and enable:
- Create Users
- Update User Attributes
- Deactivate Users
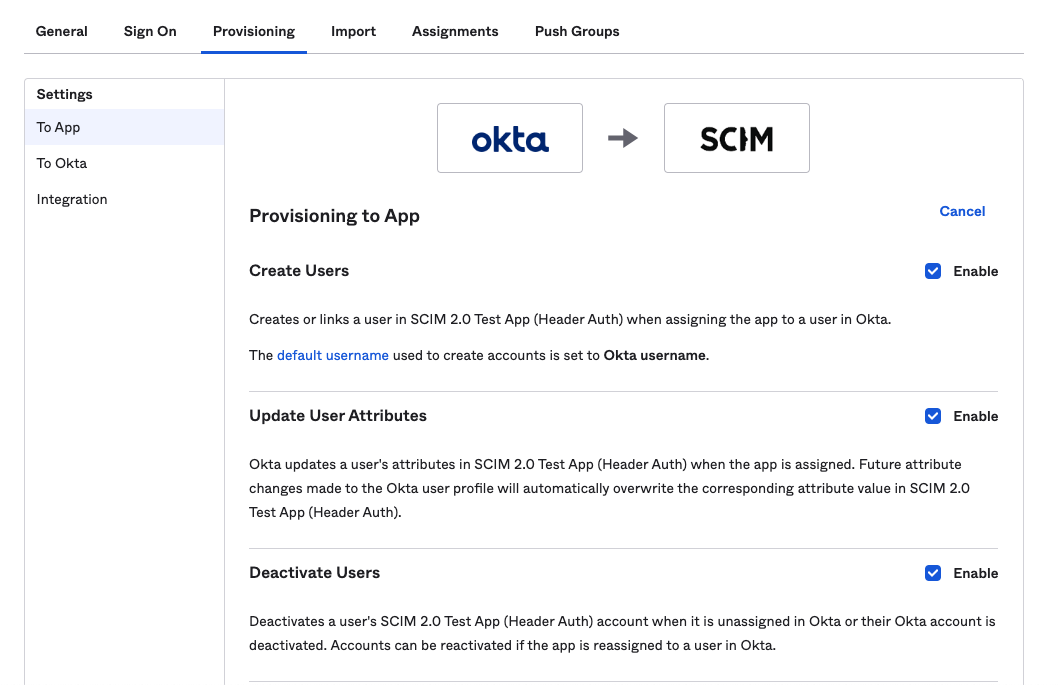
Select Save to complete the configuration.
In the Assignments tab, add the users and groups you want to synchronize with Cloudflare Access.
Provisioning will begin immediately. To verify the integration, select View Logs in the Okta SCIM application.
Example API Configuration
{  "config": {    "client_id": "<your client id>",    "client_secret": "<your client secret>",    "okta_account": "https://dev-abc123.oktapreview.com"  },  "type": "okta",  "name": "my example idp"
}